This ATMEGA328P UNO R3 DIY Kit kit includes all the components needed to build your own Arduino compatible board.
All you need is a soldering iron, some solder, a multimeter and intermediate soldering skills. The kit comes with a USB breakout that needs to be soldered to the PCB and an ATMEGA328 microcontroller. The rest of the components are easy to solder.The microcontroller is already loaded with a bootloader so to program the board, select "Arduino/Genuino UNO" in the Arduino IDE.
The USB to serial module included in this kit uses a CH340 chip. You can download the driver from the "Attachments" tab.
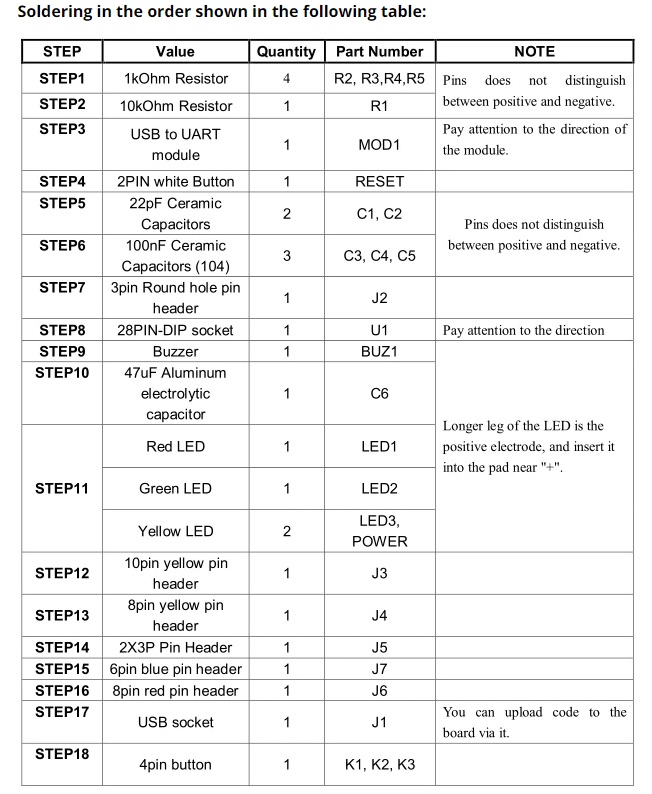
The kit includes:
- 4x 1K metal film resistor
- 2x 10K metal film resistor
- 2x 22pF ceramic capacitor
- 3x 100nF ceramic capacitor
- 1x 47uF electrolytic capacitor
- 1x 3-pin header
- 1x Buzzer
- 3x 4-pin arcade style pushbuttons
- 1x 2-pin button
- 1x 5mm red LED
- 1x 5mm green LED
- 1x 5mm yellow LED
- 1x 10-pin yellow female header
- 1x 8-pin yellow female header
- 1x 2x3-pin header
- 1x 6-pin blue female header
- 1x 8-pin red female header
- 1x DIP28 IC socket
- 1x ATMEGA328P microcontroller with Arduino bootloader
- 1x HC-49S 16MHz low profile crystal oscillator
- 1x CH340 USB to Serial module
- 1x USB B Socket
- 1x USB B Cable
- 1x Double-sided PCB

Then plug the HC-49S 16MHz crystal oscillator onto the 3pin Round hole pin header. And then you can plug ATmega328P-PU onto the 28PIN-DIP socket. Pay attention to the direction and be careful not to bend the pins. Now you can use it as a R3 board because the ATmega328P-PU has been burned for R3 bootloader.
Note: Color of PC board may vary depending on availabilty.


