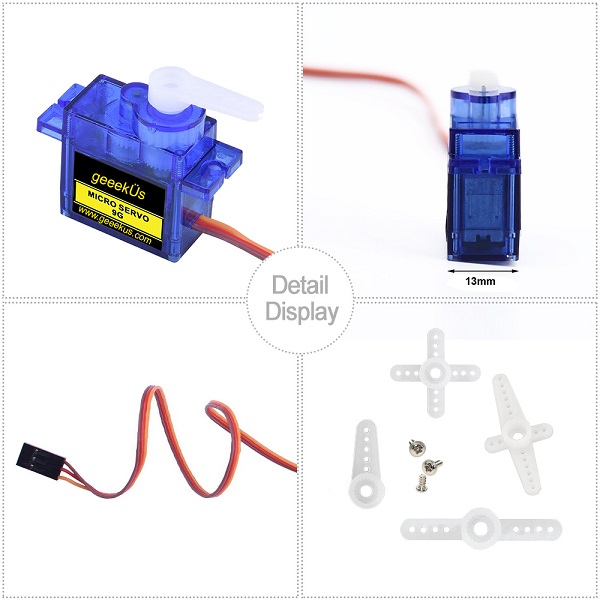


Le servomoteur geeekus 90 degeree 9G est livré avec ensemble de 4 Palonniers (contrairement aux servomoteurs SG90 similaires qui en sont livrés avec 3) et est excellent pour les étudiants, les amateurs ou les éducateurs qui veulent faire bouger les choses.
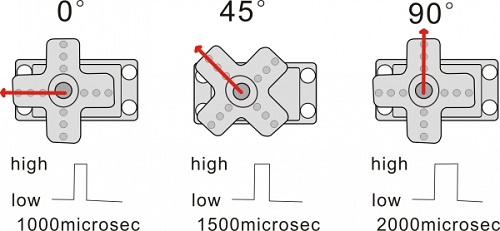
Le servo a trois interfaces, distinguées par des lignes marron, rouge et orange (parfois les couleurs diffèrent). La ligne marron est pour GND, la rouge pour l'alimentation 5V, la orange pour la borne de signal (signal PWM). L'angle de rotation du servo est contrôlé en régulant le rapport cyclique du signal PWM (Pulse-Width Modulation). Le cycle standard du signal PWM est fixé à 20 ms (50 Hz) et la largeur d'impulsion est répartie entre 1 ms et 2 ms. La largeur d'impulsion correspond à l'angle de rotation (0°~90°) du servo.
Paramètres
- Operating voltage: DC 4.8V〜6V
- Angle range: about 90°(in 1000→2000μsec)
- Pulsewidth range: 1000→2000μsec
- No-load speed: 0.12±0.01 sec/60(DC 4.8V); 0.1±0.01 sec/60(DC 6V)
- No-load current: 200±20mA(DC 4.8V); 220±20mA(DC 6V)
- Stop torque: 1.1±0.01kg/cm(DC 4.8V); 1.3±0.1kg/cm(DC 6V)
- Stop current: 600±30mA(DC 4.8V); 750±30mA(DC 6V)
- Standby current: 4±1mA(DC 4.8V); 4±1mA(DC 6V)
- Operation temperature: -10℃〜50℃
- Save temperature: -20℃〜60℃
- Motor wire length: 250 ± 5 mm
- Dimensions: 22.7mm*12.12mm*25.7mm
- Weight: 12± 1 g (without servo mou
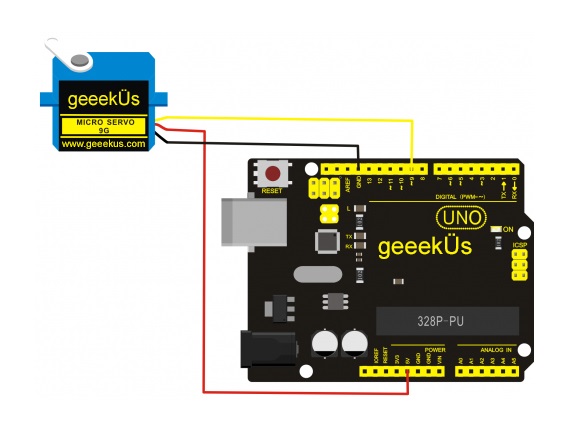
Diagramme de connexion
Connectez le moteur à la broche numérique 9
Sample Program
Il existe deux façons de contrôler un servomoteur avec Arduino. L'une consiste à utiliser un port de capteur numérique commun d'Arduino pour produire une onde carrée avec un cycle de service différent pour simuler le signal PWM et utiliser ce signal pour contrôler le positionnement du moteur. Une autre façon consiste à utiliser directement la fonction Servo de l'Arduino pour contrôler le moteur. De cette façon, le programme sera plus facile mais il ne peut contrôler que le moteur à deux contacts pour la fonction servo, seules les broches numériques 9 et 10 peuvent être utilisées. La capacité du lecteur Arduino est limitée. Donc, si vous avez besoin de contrôler plus d'un moteur, vous aurez besoin d'une alimentation externe.
Method 1:
Sample program A
int servopin=9;// select digital pin 9 for servomotor signal line
int myangle;// initialize angle variable
int pulsewidth;// initialize width variable
int val;
void servopulse(int servopin,int myangle)// define a servo pulse function
{
pulsewidth=(myangle*11)+500;// convert angle to 500-1490 pulse width
digitalWrite(servopin,HIGH);// set the level of servo pin as “high”
delayMicroseconds(pulsewidth);// delay microsecond of pulse width
digitalWrite(servopin,LOW);// set the level of servo pin as “low”
delay(20-pulsewidth/1000);
}
void setup()
{
pinMode(servopin,OUTPUT);// set servo pin as “output”
Serial.begin(9600);// connect to serial port, set baud rate at “9600”
Serial.println("servo=o_seral_simple ready" ) ;
}
void loop()// convert number 0 to 9 to corresponding 0-90 degree angle, LED blinks corresponding number of time
{
val=Serial.read();// read serial port value
if(val>='0'&&val<='9')
{
val=val-'0';// convert characteristic quantity to numerical variable
val=val*(90/9);// convert number to angle
Serial.print("moving servo to ");
Serial.print(val,DEC);
Serial.println();
for(int i=0;i<=50;i++) // giving the servo time to rotate to commanded position
{
servopulse(servopin,val);// use the pulse function
}
}
}
Method 2:
Analysez maintenant la fonction d'asservissement intégrée d'Arduino et certaines déclarations courantes.
- 1. attach(interface)——select pin for servo, can only use pin 9 or 10.
- 2. write(angle)——used to control the rotate angle of the servo, can set the angle among 0 degree to 90 degree.
- 3. read()——used to read the angle of the servo, consider it a function to read the value in the write() function.
- 4. attached()——determine whether the parameter of the servo is sent to the servo pin.
- 5. detach()—— disconnect the servo and the pin, and the pin(digital pin 9 or 10) can be used for PWM port.
Note: the written form of the above statements are " servo variable name. specific statement ()", e.g. myservo. Attach (9).
Still, connect the servo to pin 9.
Sample program B
#include <Servo.h>
/*define a header file. Special attention here, you can call the servo function directly from Arduino's software menu bar Sketch>Importlibrary>Servo, or input  #include <Servo.h>. Make sure there is a space between #include and  <Servo.h>. Otherwise, it will cause compile error. */
Servo myservo;// define servo variable name
void setup()
{
myservo.attach(9);// select servo pin(9 or 10)
}
void loop()
{
myservo.write(90);// set rotate angle of the motor
}